Garden Tips
Aloe Vera Care
Jul
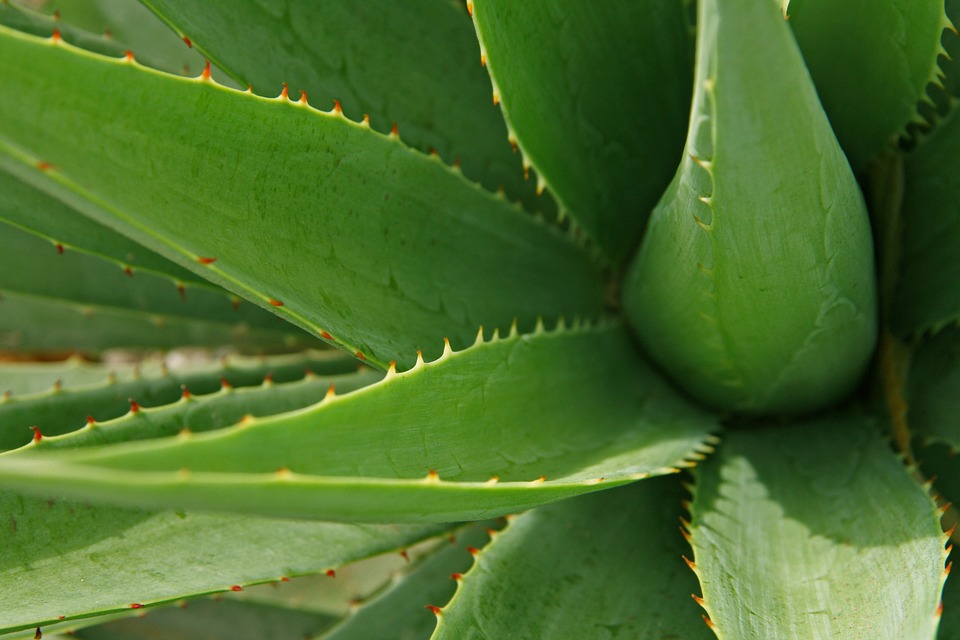
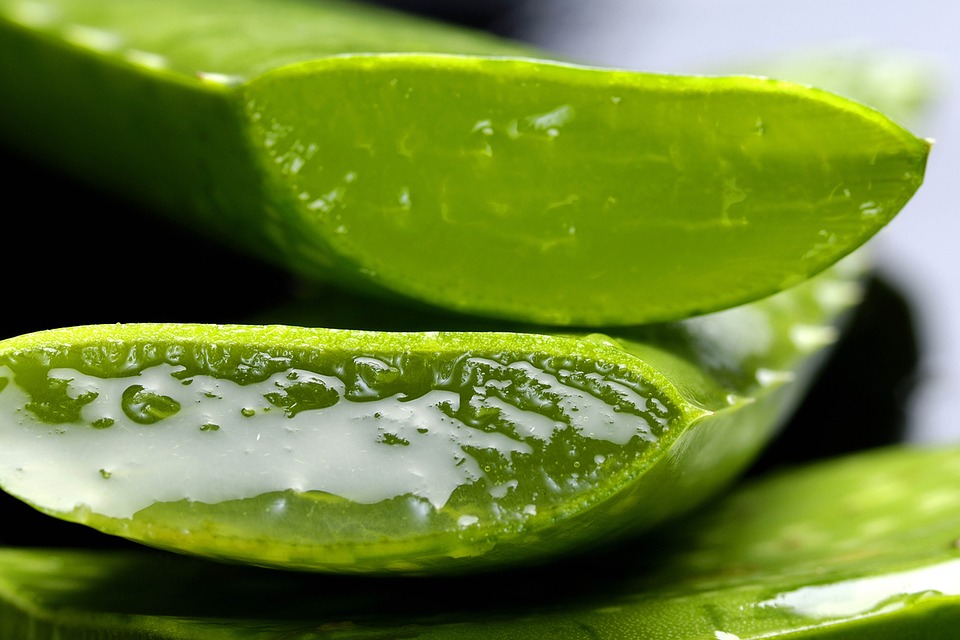
This low care plant is a member of the succulent family. Not only do it’s spikes look attractive, but the gelatinous inner membrane of those leaves have a variety of uses from soothing burns to treating acne.
Light – Bright light. Aloe can tolerate some direct sunlight but can “tan” if it’s getting too much. Should this happen, reduce the amount of direct sunlight and its leaves will return to normal in a few days.
Water – Allow soil to dry out fully between waterings and thoroughly saturate. *Some potting soils may take a while to absorb water after being dry for a long period of time. This is referred to as becoming “hydrophobic” and can be overcome by repeatedly watering the soil and draining excess water, until the soil becomes saturated.*
Soil – Well-draining soil. Espoma Cactus Soil is an excellent choice for Aloe, though all purpose potting soil can be used as well. If you find your soil is staying too wet, add perlite to increase drainage or decrease watering.
Temperature – Aloe can tolerate temperatures between 55° to 85°. Don’t expose to temperatures below 40° and protect from frosts.
Humidity – Average home humidity levels are preferred.
Fertilization – Aloe is not a heavy feeder. Fertilize once a year, either with an all-purpose fertilizer like Bonide Liquid Plant Food or a cactus fertilizer like Bonide Cactus Food.
Size – Aloe can reach 1 to 2 feet tall and wide.
Repotting – Extremely slow growing, Aloe do not need to be repotted very often, though they will enjoy having their soil refreshed every 1 to 2 years. When repotting Aloe, select a shallow container with good drainage, no more that 2 sizes wider than its current pot.
Propagation – Aloe produce “offsets,” miniature Aloe plants that emerge from the main root system. Once these offsets have developed a decent root system, they can be separated from the main plant and be planted on their own.
Toxicity – Toxic to pets when ingested. Can cause mild digestive issues in people when ingested.
How to Harvest Aloe – Aloe is generally considered harvestable once it’s a year old.
- To begin harvesting, select outer leaves as Aloe produces new growth from the inside. Pick leaves that are healthy and firm. Pick no more than 1/3 of the leaves at a time and cut them off with a sharp knife or scissors as close to the base of the plant as possible (be careful not to cut any roots).
- Using a sharp knife, cut off the spines along both sides of the leaf.
- Next, separate the flesh from the gel inside. You can use a knife but it easy to separate the skin from the gel by gently sliding a finger between them. If your Aloe leaves are very long, cut them into smaller pieces to make them easier to manage.
- The gel is ready to use! Extra gel can be stored in the refrigerator for up to 3 days or frozen for up to 3 months.